How to batch edit images - fast & easy in Zoner
We had to solve many things during our trip around the world and one of them was how and whit which program to edit our taken photos. Photos were rapidly increasing by number (tens of thousands of photos were no problem to shoot). But when you are in a foreign country where the internet is either slow or expensive and you still want to share your adventures with the others, then you need to reduce or convert your photos. At the same time you want to protect photos and finally need to crop photos, adjust colors and much more. To do this you need some capable photo editor which can work with batches of photos. Zoner Photo Studio (aka ZPS) was for us the ideal choice. We also tried alternatives but eventually we always came back to the ZPS.
Today we will focus on usual requirements you can fulfill with this powerful tool with minimal effort. We will not cover the entire list of application features but we will focus on those we’ve found the most useful during our trip around the world and which may help you as well (not only) when traveling. This guide is not designed for photographers professionals, but for most of us, ordinary photographers.
7 photo editing steps every photographer should know
Or prepare photos for uploading on Facebook or your own website. This seemingly short process consists of many steps as you find out soon. ZPS has helped this otherwise long and error-prone process almost automates. We will show you how.
Our editing process has 7 consecutive steps *:
- Changing dimensions (resize)
- Inserting a watermark into the picture – your photos are your work, protect them.
- Auto enhancing – shooting mode is not always chosen correctly so it needs to fix some imperfections.
- Color Temperature – it seems to you that your camera uses the pictures too cold or warm colors? Here is the solution.
- Enhance colors – each camera is taking photos with different color sensitivity not only because of color modes hence it needs to do some corrections.
- Enhancing compression ratio – another way to reduce the size.
- Renaming – instead of DSC5432.jpg to something more human like IMG_20161013_1355.jpg (date and time, or you can also add space).
* We took pictures in JPEG format only. When you shoot in RAW format then count with higher requirements for HW as batch editing will take longer and some editing steps might be different (based on advantage of RAW format).
Surely you will agree with us that if we had to do each step manually even for several dozen galleries it would take ages and then we could not enjoy travelling at all. Moreover travelers have often multiple different photo equipment so points 4 and 5 above should ideally be tailored for each of the cameras.
Preparation and photo organization
We always edited photos in a way that we keep the originals somewhere aside in case of destructive changes. We simply took pictures from the camera and put them into Original directory and we kept these photos away. Definitely use similar or different approach in order to be able to get original photos back. ZPS is perfect photo organizing tool and can facilitate work.
How to batch edit photos in Zoner Photo Studio
1. Selecting photos
Prepare photos for editing into one folder. Select photos you want to edit in Manager by using Ctrl + mouse click on a photo, or to select all pictures press Ctrl + A. Selected photos are marked by blue.
2. Setting up the bulk changes
Select Menu / Edit / Batch Filter or Ctrl+Q (remember this shortcut you will use it often). You’ll see a preview of the photo before the change (left) and after (right).
3. How to add new filter
First click on Remove the filter, so you make a free space for your filters. Now click in the upper right on the + Add Filter. You’ll see a selection of filters.
4. Choosing the correct filters
Select and adjust gradually following filters:
a. Change dimensions (Resize)
In this step we will resize photos. With smaller photos the job is faster. You do not have to wait so long for computer processing. Set the Width and Height both to 1600 (pixel size sufficient for web, facebook, etc.) Setting respects photos for height and width, so you don’t have to worry that all photos will have these dimensions. It is boundary size for both directions.
b. Text Overlay
Authorship on pictures can be seen using watermarks. Just fill fields like on picture from top to down – Watermark text, font style (ideally, use the font as you have on your website), white color, place watermark on the bottom right, Check the field as watermark and adjust the Opacity which is the “strength of visibility effect” of the watermark (in this case 40%).
c. Quick Fix
ZPS in default has very useful filter that can adjust photos automatically based on a predefined algorithm, which works with various input information of photo (eg. color, sharpness, contrast, etc.). In 98% of the work is done well and we never needed to switch this filter off.
d. Adjust the color temperature
You have several cameras (eg. SLR, compact, outdoor camera) and want to take warmer pictures using one particular camera, because this camera is normally shooting colder colors. Here is where you can play. Our setup is shown below.
e. Enhance colors
The reason is same as in the previous point. Photos have different colors based on its source and shooting mode or you just want to add a bit of brightness and contrast.
f. Changing compression ratio
After filters above gradually shrink your photos, fix flaws, tune colors it is time to do another shrink in terms of size. We will do so by setting compression. Reasonable limit is 85, anything smaller leaves a noticeable ghosts marks. The photo is also saved as JPEG format.
g. Renaming photos
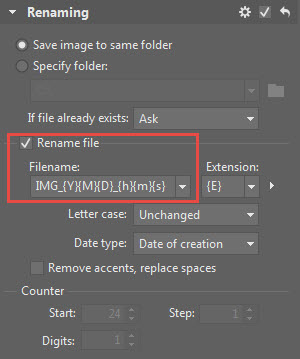
You will often come back to photos, sort them in different ways and programs and especially (only few realize) you might accidentally rewrite photos because you have several cameras and name files are generated automatically including restarts (typically DSCN9999 to DSCN0001). We remember moments when newer photos wanted to rewrite older ones. Basically a unique photo name can make your life easier. Choose parameters which can help you to find yout when (abd where) the photo was taken. It is a key to a reasonable job with photos. Make settings as in the picture below, or use this mask IMG_ {Y} {M} {D} _ {h} {m} {s}, which says that the new file name will be in the pattern IMG_YEARMONTHDAY_HOURMINUTESECOND.
Date is filled based on creation date (day of shooting), which may in some cases (sequence shooting or shoot in HDR) lead to the same time for several photos (about 8% of cases in our experience). This can be solved only with manual renaming or modifying data in the EXIF photo information. You do so when you push shortcut Shift + Enter on the picture, select the camera icon and change the time (seconds is enough) in field Created.
5. Saving filters
Remember to save the batch filters setting so next time you can load it all with on one mouse click. In case you plan to have a watermark in different languages (eg. nasecestakolemsveta.cz), we recommend you to save your settings twice each time with another text in point 4b Likewise, consider several options for each of your cameras (but then you have to process pictures from each camera separately).
6. Result before batch processing
Looks like the picture below. On the right you have all applied filters and on the left before changes. At first glance, you can see that the picture has changed, it is colorful with more contrast and contains a watermark at the right bottom.
Upon closer examination you will see the picture has not improved only in the visual. As shown on the picture below. The original image had a size of about 6.2 megabytes, and his name was strange. The adjusted picture is only about 0.68 megabytes, and gives the name from which is easy to determine when it was taken.
7. Application of batch filter
Click to Apply to All at the bottom right in order to start the process of batch editing for selected photos. Now you have a few minutes to finish your coffee / tea and planning another trip.
Why batch editing photos is worth it
From our own experience we can recommend to use batch editing photos in Zoner Photo Studio. Imagine a situation where you have for example 100 photos with a total size of over 700 MB. You need to publish some of them after several days. You are in an internet cafe, a hotel or you have purchased a mobile Internet. Uploading of such large size of images would take a very long time (even hours) and may be expensive. Using batch editing photos, we described you above, may help you to reduce size of your images in about 10 minutes. At the same time, images will look better and will be protected by watermark. In final size about 75 megabytes the photos will be uploaded in tens of minutes, so you can shoot more pictures soon after 😉 At the same time inserting the following edited and compressed photos to your site will significantly influence and speed up page load time.
Tento příspěvek je také k dispozici v jazyce: Czech


